Introduction
One of the best parts of developing software with Clojure is that it is truly full-stack: it's an extremely powerful backend language that leverages the Java Virtual Machine, and it can also develop complex and performant React applications with ClojureScript. Add in the Speclj testing framework, and Clojure becomes a powerhouse for Test-Driven Development (TDD).
TDD in ClojureScript is not without its challenges, though. While writing backend tests is relatively straightforward, testing the frontend requires rendering the Document Object Model (DOM) and simulating user events, like clicking buttons and seeing when things change on the page. Add in the fact that ClojureScript and the corresponding Speclj tests need to be compiled to JavaScript before the tests can run, and we're looking at a formidable barrier to entry. The added difficulty leaves many developers feeling daunted and aimless, not knowing how to get started or where to find the necessary tools to make testing possible. This leads many to put off writing their tests until after they've written the code or to forego testing the frontend all together.
This is a shame, because without tests for frontend code, development teams become dependent on expensive Quality Assurance teams to do time-consuming manual testing, clicking all the buttons and links and trying to do everything they can predict a user might do. This is costly, slows down development, and is vulnerable to human error. But with writing frontend tests, it's like having our own robot user specifically for our application that can do all the clicking and dragging and typing for us, and in a matter of seconds (sometimes even less than a second).
Well, the search for tooling is over and the time for frontend TDD is now. Thanks to Scaffold by Clean Coders, it's easier than ever to use Speclj and ClojureScript to make fully tested, dynamic frontends using TDD. In this article, I'll explain step-by-step how to use Scaffold to take a pre-existing Clojure project and turn it into a full-stack TDD environment.
What is Scaffold?
Scaffold is a library that is part of c3kit - Clean Coders Clojure Kit, a collection of libraries that help make developing Clojure applications a breeze. Scaffold compiles ClojureScript and Speclj tests to JavaScript and uses Playwright to headless-ly render the DOM on the Chromium engine and run tests. It even compiles Garden to CSS, meaning all the frontend styles can be written in Clojure, too!
Before using Scaffold, though, there are five steps needed to set up the project to have a frontend:
- Change the Project Structure
- Add the Resources Directory
- Configure ClojureScript Compilation
- Configure CSS Compilation (optional)
- Create a Basic HTML File
- Add Dependencies to
deps.edn
Let's get started!
1. Change the Project Structure
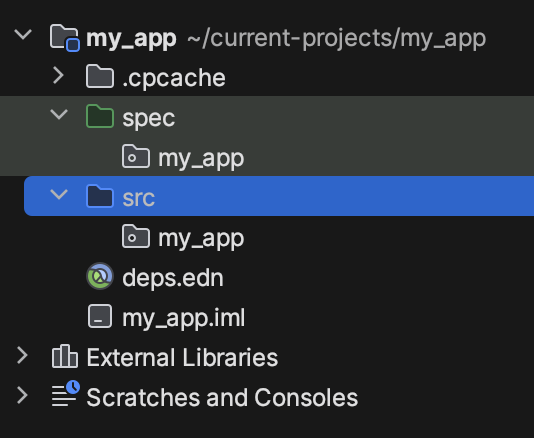
First, it's important to make sure the project's structure is set up to house both Clojure and ClojureScript files. If your project hasn't needed any ClojureScript up to this point, the project structure may look something like this:

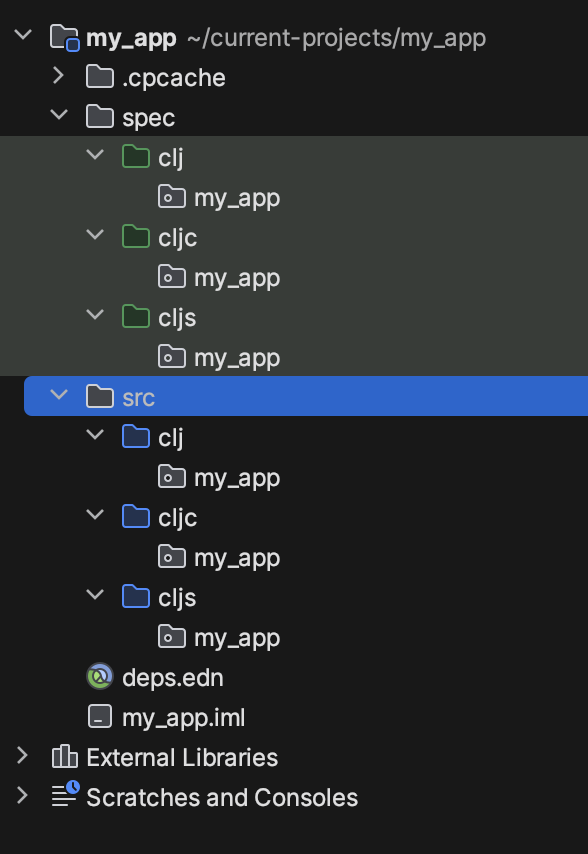
Now, the src and spec directories will need separate clj and cljs directories inside them, as well as a cljc
directory for code that is used in both the backend and frontend. .cljc is the file extension for Clojure Commons, and
these files will run as Clojure when they are required by .clj files and as ClojureScript when they are required
by .cljs files. The resulting project structure looks like this:

Notice that src and spec are no longer marked as "Sources Root" and "Test Sources Root," but rather
the clj, cljc, and cljs directories inside of them are. To make sure the project knows the new locations of the
source files and test files, we need to update the paths in our deps.edn:
{
:paths ["src/clj" "src/cljs" "src/cljc"]
:aliases :test {:extra-paths ["spec/clj" "spec/cljs" "spec/cljc"]}
}
This points our application to the three directories inside of src when running the
clj -M:<args> command, and the :test alias with the :extra-paths option tells it to also look at the directories
in the spec folder when adding the alias to the command, e.g
clj -M:test:<args>.
Since this refactor likely affected every file the project, it's important to re-run the tests to make sure everything is still working properly before proceeding.
2. Add the Resources Directory
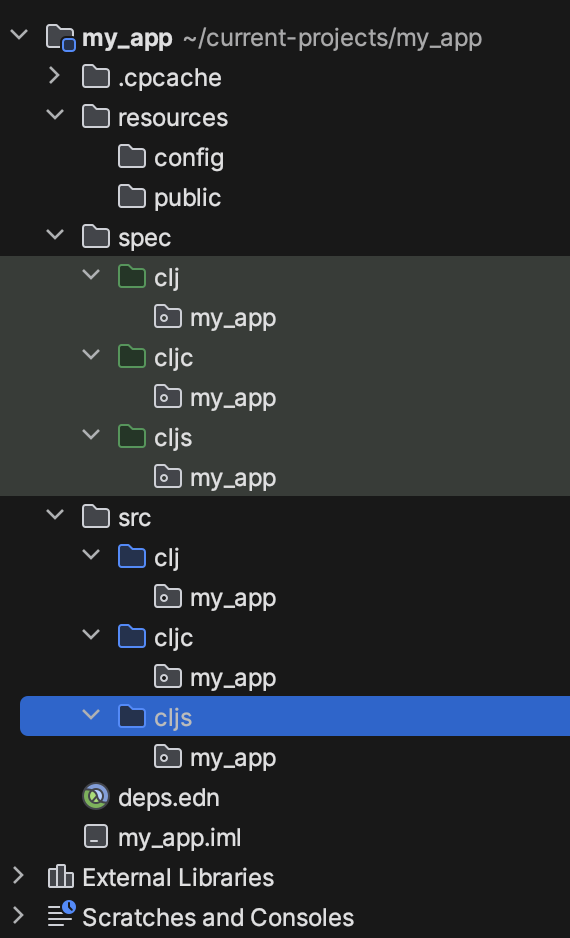
Next, there needs to be a resources directory at the top level of the project structure as well. This will house
a config folder and a public folder.
- The
configfolder is for storing files that configure Scaffold's settings for compiling ClojureScript and Garden CSS. - The
publicfolder will be served to the browser. Thepublicfolder is where Scaffold will output the compiled JavaScript and CSS files into the subfolderscljsandcss, respectively. It is also where static assets like images, fonts, and HTML files are stored. If the application won't be dynamically generating the initial HTML response, theindex.htmlfile will be stored here.
The project structure should now look like this:

In order for Clojure to have access to the resources folder, it needs to be added to the paths in deps.edn along
with the other source folders:
:paths ["src/clj" "src/cljs" "src/cljc" "resources"]
3. Configure ClojureScript Compilation
As mentioned above, Scaffold needs configuration settings to know how to compile ClojureScript. It looks for these
settings in a cljs.edn file inside of resources/config.
Here's an example of what cljs.edn should look like:
{:ns-prefix     "my_app"
 :ignore-errors ["goog/i18n/bidi.js"]
 :env-keys      ["cc.env" "CC_ENV"]
 :development   {:cache-analysis true
                 :optimizations  :none
                 :output-dir     "resources/public/cljs/"
                 :output-to      "resources/public/cljs/my_app_dev.js"
                 :pretty-print   true
                 :sources        ["spec/cljs" "src/cljs" "spec/cljc" "src/cljc"]
                 :specs          true
                 :verbose        true
                 :watch-fn       c3kit.scaffold.cljs/on-dev-compiled
                 :parallel-build true}
 :production    {:cache-analysis false
                 :infer-externs  true
                 :optimizations  :advanced
                 :output-dir     "resources/public/cljs/"
                 :output-to      "resources/public/cljs/my_app.js"
                 :pretty-print   false
                 :sources        ["src/cljc" "src/cljs"]
                 :specs          false
                 :verbose        false
                 :language-in    :ecmascript-next
                 :language-out   :ecmascript-next}}
Let's take a closer look at a few key settings:
:ns-prefix: The beginning of the namespace name for all the project's files. This must match the name of the packages inside theclj,cljc,and cljsdirectories.- NOTE: Clojure uses hyphens in the namespace names in the files, but underscores in the names of files and
packages. The value given to
:ns-prefixmust use underscores, not hyphens.
- NOTE: Clojure uses hyphens in the namespace names in the files, but underscores in the names of files and
packages. The value given to
env-keys: This specifies the name of environment variables on the system that store the name of the runtime environment. For example, the EC2 instance that is running the application in production would have an environment variableCC_ENV=production. Scaffold uses these environment variables to detect which compilation settings it should use. If no environment is found, it defaults to:development.:output-dir: The directory in which Scaffold will store the compiled JavaScript files. If the directory does not exist, Scaffold will create it.:output-to: The name of the JavaScript file that is the main entry point of the application. This file is what will be imported in the HTML that is served to the browser.:sources: The directories containing files that Scaffold will compile.
4. Configure CSS Compilation (optional)
Next is telling Scaffold how to compile CSS files written in Garden. If you prefer to write vanilla CSS, this section
can be skipped. Simply place the CSS files in the resources/public/css directory. If you prefer CSS modules or
pre-processors like SCSS, you'll need to add the proper tooling to the project.
In resources/config, add a css.edn file with settings similar to this:
{:source-dir "dev/my_app/styles"
 :var my_app.styles.main/screen
 :output-file "resources/public/css/my_app.css"
 :flags {:pretty-print? true
         :vendors ["webkit" "moz" "o"]}}
Let's take a closer look:
:source-dir: This tells Scaffold what directory our Garden files are stored in. Clean Coders convention is to have adevdirectory at the root of the project and to place all Garden files indev/my_app/styles. This directory then needs to be added to the:extra-pathsin the:testalias of yourdeps.edn.:var: This tells Scaffold the name of the variable that bundles all the styles.:output-file: The name and path of the compiled CSS file that will be created by Scaffold.:flags: This specifies extra compiler options. In this example, the CSS is being pretty-printed for human readability, and the proper vendor prefixes are added where necessary to ensure cross-browser compatibility.
5. Create a Basic HTML File
Now that we are set up for CSS and JavaScript, it's time to create a basic HTML file to bring it together. Those that
have used Vite or the now deprecated create-react-app will be familiar with the concept of a
barebones HTML file; this primarily serves to ship the CSS and JavaScript files to the browser and create a root DOM
node for the JavaScript to inject content into. That barebones HTML looks something like this:
<!DOCTYPE html>
<html lang="en">
<head>
  <meta charset="UTF-8">
  <title>My App</title>
  <script src="https://cdnjs.cloudflare.com/ajax/libs/core-js/3.13.1/minified.js" type="text/javascript"></script>
  <script src="./cljs/goog/base.js" type="text/javascript"></script>
  <script src="./cljs/my_app_dev.js" type="text/javascript"></script>
  <script type="text/javascript">goog.require("my_app.main")</script>
  <link type="text/css" rel="stylesheet" href="./css/my_app.css"/>
</head>
<body>
  <div id="app"></div>
  <script type="text/javascript">
    my_app.main.main()
  </script>
</body>
</html>
This imports our JavaScript and CSS, creates a <div> with an ID of "app" so the JavaScript has a DOM node to render
the application in, and executes our React application by invoking my_app.main.main().
If your application already has an HTTP server, add a route that will serve this HTML as the body of its HTTP response. There are two things that will need to change dynamically based on the environment:
- In production, the JavaScript file will need to be
my_app.jsinstead ofmy_app_dev.js. This file is compiled with advanced optimizations for performance and bundle size and has all of your application's JavaScript in one file. - Since everything ships to production fully compiled and in one file, the
goog/base.jsfile is not needed in production either, but is needed in development.
If your application doesn't have an HTTP server because you plan on compiling the application down to static files and
hosting them on a web server from a service like Netlify or Vercel, simply create an index.html file
in resources/public and load this in your browser to view your app. If you'd like a local development server, I
recommend installing this HTTP server via Homebrew or NPM and configuring
it to serve the resources/public directory.
6. Add Dependencies to deps.edn
We're almost there! Now we just need to pull Scaffold into our project as a dependency (along with a few friends), and configure some new aliases to make it easier to run the different commands.
In deps.edn, add the following to :deps and :aliases:
{
 :deps { cljsjs/react {:mvn/version "17.0.2-0"}
         cljsjs/react-dom {:mvn/version "17.0.2-0"}
         reagent/reagent {:mvn/version "1.2.0"}
         com.google.jsinterop/base {:mvn/version "1.0.1"}
         com.cleancoders.c3kit/wire {:mvn/version "2.1.4"} }
 :aliases { :test { :extra-deps { org.clojure/clojurescript {:mvn/version "1.11.132"}
                                  com.cleancoders.c3kit/scaffold {:mvn/version "2.0.3"}}}
            :cljs {:main-opts ["-m" "c3kit.scaffold.cljs"]}}
            :css  {:main-opts ["-m" "c3kit.scaffold.css"]}
}
This pulls in React and Reagent into the application, as well as JavaScript interop for Java/Clojure. It also pulls in Wire, another c3kit library that helps with writing frontend tests, writing JavaScript interop in a Clojure-idiomatic way, and facilitating communication between frontend and backend.
It also pulls in ClojureScript and Scaffold as :extra-deps, which means they will only be used when the :test alias
is used. This is the deps.edn version of the NPM
devDependencies.
The last two lines are creating aliases for compiling ClojureScript and CSS. For those unfamiliar with using aliases,
running a file in a deps.edn project would typically require typing this in the terminal:
clj -M -m name_of_file
Since Scaffold is only available in the :test alias, this means to compile ClojureScript we would need to type:
clj -M:test -m c3kit.scaffold.cljs
That's no fun! By creating aliases for these commands, to compile ClojureScript we can now simply type:
clj -M:test:cljs
And to compile CSS we can simply type:
clj -M:test:css
Let's Write Some Code!
Finally! With all that setup done, we're finally ready to start writing our frontend code. The first thing any React
application will need is a function that will render our application into that
<div id="app"></div> from our HTML.
Let's start by writing a test that will check that a <div> with an ID of "hello-world" is being rendered to the page.
Create main_spec.cljs in spec/my_app/cljs with the following code:
(ns my_app.main-spec
  (:require-macros [speclj.core :refer [it describe before]]
                   [c3kit.wire.spec-helperc :refer [should-select]])
  (:require
    [speclj.core]
    [c3kit.wire.spec-helper :as wire]
    [my_app.main :as sut]))

(describe "main"
  (wire/with-root-dom)
  (before (wire/render [sut/app]))

  (it "renders to the page"
    (should-select "#hello-world")))
Notice that the Speclj functions we are used to pulling in under :require now need to be pulled in
using :require-macros. Clojure allows us to pull in macros with :require, but ClojureScript does not.
Running clj -M:test:cljs should show us a failing test. It will patiently wait for us to write more code and
automatically recompile and re-run our tests when it detects a change.
To make our test pass, create a main.cljs file in src/my_app/cljs with the following code:
(ns my_app.main
  (:require [reagent.dom :as rdom]
            [c3kit.wire.js :as wjs]))

(defn app []
  [:div#hello-world])

(defn ^:export main []
  (rdom/render [app] (wjs/element-by-id "app")))
This ^:export main function is the ClojureScript version of the familiar React code:
ReactDOM.createRoot(document.getElementById('app')).render(
  <React.StrictMode>
    <App />
  </React.StrictMode>
)
Now the app component and all of its children will be rendered in the browser, and if we open the Inspector in the
browser we should see a <div id="hello-world"></div> in the webpage's HTML.
And just like that, we are set up to use Test Driven Development to write complex React applications in the world's best full-stack programming language... or at least we think it is.
A Quick Note on Clojure Commons
As you develop your app, you'll find functions that were written on the backend that you'll also want to use on the
frontend. Thanks to Clojure Commons, it's possible to move these functions into a .cljc file and use them in both
places, avoiding duplicate code.
However, there are differences between ClojureScript and Clojure that can lead to some major headaches if you're not
aware of them. For example, ClojureScript does not support :refer :all when requiring a namespace, so any namespaces
that use :refer :all will need to be refactored when moving them into CLJC.
For functions or namespaces that may need minor adjustments to be able to work with CLJS (e.g. Java interop vs JavaScript interop), reader conditionals can be very useful.
Every time a function or namespace is moved into CLJC, immediately re-run your tests on both the frontend and backend so that you immediately catch if there's an incompatibility and solve it before it becomes a headache. If you're moving multiple namespaces, I recommend moving them one at a time and running the tests after each one.
Conclusion
The first time I set out to write test-driven ClojureScript, it felt like standing on the base of a mountain with no idea how to start climbing. I found myself thinking, "Couldn't I just look at the browser window as I was writing code and see what was happening?" Having to write tests felt like it was just getting in the way of being able to actually write code.
With Scaffold and Wire, though, all of a sudden it was fun to be coding my own little virtual robot to click, drag, and navigate my application for me. As I focused on the code and my need to check the browser window diminished, my development time got faster. Hopefully with this article, you can now easily add a test-driven frontend to any Clojure project. Better yet, you could create your own starter repository to use as a template for future projects — your very own Clojure version of Vite!
Remember the three steps of TDD: Red, Green, Refactor. Writing tests is hard, and if you're new to writing tests on the frontend, it's a huge learning curve. That's why so many developers outside of Clean Coders wait until they are done writing code to write their tests, or forego testing altogether! But it's a discipline that is so worth it. Imagine writing an entire web app without checking your browser every five minutes and manually clicking every button to see if it's working. Imagine refactoring your code with reckless abandon without fear of introducing bugs into the system. The only way to get that kind of code coverage is to write your tests alongside your code.
Despite the extra legwork to get up and running, writing React applications in ClojureScript really is such a joy. I hope this article helps you enjoy it as much as I do.
Happy coding!