
Memorial Day was just last month, which for many of us meant a three-day weekend. Ahhh the three-day weekend, that wonderful time when I can finally get around to some of the things I've been putting off, like:
- actually cleaning my office
- getting to that one task that keeps slipping to the bottom of the honey-do list, or
- finally starting to build that new app I've been thinking of for months.
The idea of starting to build out a new application is always exciting; as developers, we get our kicks on turning ideas into functioning software. All too often, though, our excitement is extinguished as we're quickly reminded of how much upfront boilerplate we need to write before we actually get to the fun part of developing features.
The JavaScript world has npm create vite@latest or npx create-next-app. Rails has rails new. You answer a few prompts, hit enter, and you've got a working app — routing, asset pipeline, database, the whole stack.
When it comes to building a Clojure app, however, there isn't something like Vite that makes building from a template so easy...
So we built it!
Introducing our newest addition to the Clean Coders Clojure Kit (c3kit):
c3kit-jig, an interactive CLI written in Babashka with a library of templates to get your next project started faster.
If you've never set foot in a woodshop, the name might need a little unpacking. A jig is a fixture a woodworker builds once to guide the tool through the same cut over and over — every part comes out identical, and you never have to measure twice. You spend a bit of effort up front building the jig so that every part after it is fast, repeatable, and correct. That's exactly the trade c3kit-jig makes for your project setup: the boilerplate gets built once, the right way, so every app you scaffold starts from the same solid, tested foundation.
What you get
Out of the box, c3kit-jig ships one template — full-stack-reagent — which produces:
- Clojure backend using Compojure for routing and the c3kit family for the boring-but-essential stuff (config, persistence, HTTP plumbing).
- Reagent frontend with CLJS routing via Secretary + Accountant and hot-reloading CLJS and Garden-style CSS compilation brought to you by C3Kit Scaffold.
- Speclj test suites wired for Clojure, CLJS, and CLJC out of the box - all the template code is tested and available for you to change or extend as needed.
- A choice of four database backends — Datomic Pro, SQLite, Postgres, or in-memory — selected at scaffold time. You can easily change to any other database supported by C3Kit Bucket by editing the bucket configuration in
config.clj. - Optional features you can opt in or out of: a Markdown content pipeline, server-side rendering, JWT auth, and WebSockets.
- A
git init+ initial commit so you start with a clean history.
Installing the CLI
One curl-pipe-bash and you're done:
curl -fsSL https://raw.githubusercontent.com/cleancoders/c3kit-jig/main/cli/install.sh | bash
The installer checks for Babashka, Java, and gum (the Charm CLI toolkit that powers the checkbox UI). If Babashka or gum are missing, it tells you it will install those dependencies along with the CLI and asks permission to proceed. If Java is missing, it warns you that you'll need it for Clojure development to work. The CLI itself is a single bb uberscript distributed via GitHub Releases.
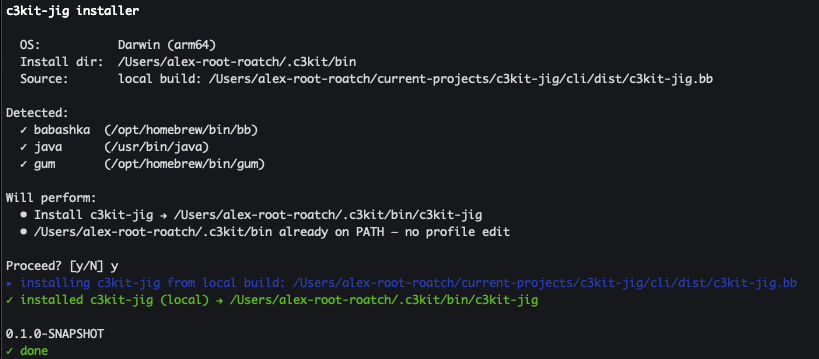
Note: Babashka is required because
c3kit-jigis abbscript. Java 17 or newer is only needed for the projects you scaffold, not for the CLI itself.
If you don't trust pipes-into-bash (fair), you can grab install.sh, eyeball it, and run it locally. It's about 200 readable lines of bash.
Command surface
Running c3kit-jig with no args prints the help screen:
c3kit-jig — scaffold and manage c3kit Clojure projects

USAGE
  c3kit-jig <subcommand> [options]

SUBCOMMANDS
  create [<name>] [options]   Scaffold a new project from a template
  list                        List available templates
  upgrade                     Download latest CLI release
  version                     Print CLI version
  help                        Show this help
The one you'll use 99% of the time is create. Everything else is housekeeping.
Useful flags
Run c3kit-jig create --help and you'll get the full list:
| Flag | What it does |
|---|---|
-t, --template ID |
Template id (skip the template prompt). |
--template-ref REF |
Git ref / tag / branch to fetch the template from. |
--template-dir PATH |
Use a local templates dir instead of fetching (great for template development). |
-y, --yes |
Accept all feature defaults. Non-interactive. |
--install |
Run clj -P and npm install after scaffold. |
--no-git |
Skip git init and the initial commit. |
--db ID |
Database id (skip the database prompt). |
--feature K=V |
Override a feature default (repeatable, e.g. --feature auth=false). |
--debug |
Print full stack traces on error. |
-h, --help |
Show this help. |
Running it in CI
Every prompt the wizard asks has a flag equivalent, which means you can drive the whole thing non-interactively — exactly what you want in a CI pipeline or a setup script. Pass --yes to accept defaults, then override anything you care about with --template, --db, and one --feature K=V per toggle. --yes requires --template, since there's no sensible default for which template to scaffold:
c3kit-jig create my-app \
  --template full-stack-reagent \
  --db sqlite \
  --feature auth=false \
  --feature ssr=false \
  --yes --no-git
That runs start to finish with zero prompts. Or, if you'd rather be walked through it — and I'd recommend that the first time — just run c3kit-jig create and let the wizard drive.
The interactive wizard
c3kit-jig create walks you through every decision the template exposes, one prompt at a time.
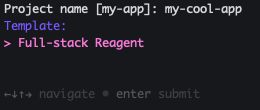
1. Project name
Project name [my-app]: my-cool-app
It validates the name (kebab-case, no reserved words) and uses it to derive every variant the template needs — my-cool-app for namespaces, my_cool_app for directory paths, MyCoolApp for display strings, and MY_COOL_APP_ for env-var prefixes. You name it once and the CLI handles the rest.
2. Template selection
If you only have one template available (currently the case), this step is a one-line confirm. When more templates ship — and several are in the roadmap — you'll see a picker:
3. Feature checkboxes
If gum is installed (and it will be, since the installer drops it in), you get a real checkbox UI. Spacebar toggles, enter confirms. Defaults are pre-checked based on the template manifest.
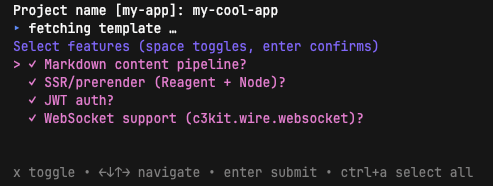
If gum isn't around (say, you're SSH'd into a stripped-down box), it falls back to a simple y/n prompt for each feature, one at a time. Either way, you end up with the same answer set.
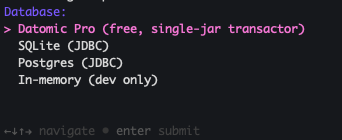
4. Database
Database:
  1) Datomic Pro (free, single-jar transactor) (default)
  2) SQLite (JDBC)
  3) Postgres (JDBC)
  4) In-memory (dev only)
Choice [default]:
The arrow-key version (also gum-powered when available) is even nicer:
5. Scaffold
Once you've answered everything, the CLI bootstraps your project — creating a new directory named after it (my-cool-app/) right in your current working directory — commits the result to git, and renders a "next steps" list that shows you all the pre-built commands that come with the template:
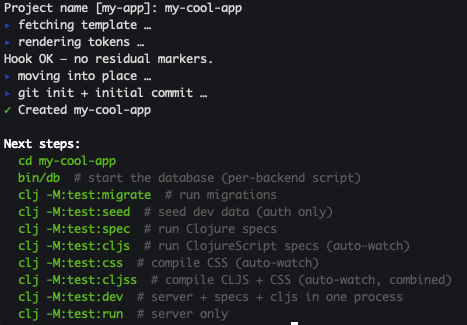
The whole thing takes a couple of seconds. And the result is an honest-to-goodness running Clojure project — clj -M:test:spec passes, clj -M:test:cljs once passes, and you can cd in and start working.
6. See it actually run
Here's the payoff: what you've got isn't a pile of stubs, it's a working app. A few commands and you're looking at it in the browser.
First, start the database (it's already configured for the backend you picked):
bin/db # start (or initialize) the database
Then compile your CLJS and CSS. This one watches for changes and keeps running, so give it its own terminal:
clj -M:test:cljss # compile CLJS + CSS, then keep watching
And in another terminal, start the dev server — also long-running:
clj -M:test:run # start the local dev server
TIP: Once your CSS and CLJS have been compiled the first time, you can skip straight to
clj -M:test:devin the future — it runs the server, the CSS compile, and the CLJS compile all in one process. (I tend to stick with the separate commands above, since I like keeping my server logs apart from my test output — but it's there if you want the one-process loop.)
Now point your browser at localhost:8123 and there's your home page — a real, styled, running app. If you opted into the content pipeline, there's an example blog post already published. If you picked JWT auth, the login flow works out of the box — sign in with one of the seeded users and you're through. Nothing to wire up first; it runs the moment it's scaffolded.

Why this is different from Vite or Rails
Before we get into the features, it's worth pausing on what just happened when you checked those boxes — because it's genuinely different from how the tools you're used to work.
When you run npm create vite@latest, you pick a template off a fixed menu — react, vue, svelte — and Vite copies that finished folder onto your disk. Same with rails new. The catch is that every template is something a person built and now maintains by hand. So you only get the combinations someone bothered to pre-build. Want "React plus auth plus server-side rendering but not the content pipeline"? That exact mix has to already exist as its own template, or you're bolting it on yourself afterward. Four optional features would mean sixteen templates to cover every combination; add four database choices and it's sixty-four. Nobody maintains that, so you get a short menu and a lot of manual wiring.
c3kit-jig flips it around. You don't pick a pre-built combination — you describe the project you want, feature by feature, and it builds that exact combination on the spot. Turn auth off and there's no leftover auth config, no commented-out routes, no dependencies you have to go delete. You get precisely the app you asked for and nothing you didn't.
And here's the part I think makes it special: you get framework-like features — auth, SSR, a content pipeline — but unlike a framework, none of it is hidden behind a dependency you can't see into. All of it is generated as plain code right in your repo. Want to change how signin works, restyle a page, or tweak the Markdown rendering? It's your code. Open the file and change it. You get the head start of a batteries-included framework with the freedom of having written it yourself.
What you actually got: a tour of the features
You just generated a repo. Here's what each feature you picked put in it, and how to start using it.
:content — Markdown content pipeline
Want a blog, docs, or marketing pages without standing up a CMS? Write Markdown files and you're done. To publish a page, drop a directory under content/<type>/<permalink>/ with two files — a meta.edn (title, description, :published? true, a date) and a content.md with your prose:
content/
  blog/
    my-first-post/
      meta.edn
      content.md
That's the whole workflow. The <type> part of the path becomes the URL, so a blog/ directory gives you a /blog index listing your posts and a /blog/my-first-post page for each one — automatically, without you adding a single route. Add a docs/ directory later and /docs just starts working. Set :published? false and a draft stays hidden. Tables and strikethrough work out of the box.
And it's not limited to plain prose. The content pipeline can swap custom Markdown tags for your own Reagent components, so a page can mix writing with live, interactive UI. In your content.md, drop a tag on its own line, written as plain hiccup:
Here's a thought worth pulling out.

[:quote-block {:text "Clean code always looks like it was written by someone who cares."
               :attribution "Robert C. Martin"}]
Then define the Reagent component and add it to the components map in content/page.cljs:
(defn quote-block [{:keys [text attribution]}]
  [:blockquote.quote-block
   [:p text]
   (when attribution [:footer "— " attribution])])

(def components
  {:quote-block quote-block})
That map is all you touch. The template already calls install-components! from main at startup, which registers every entry in the map — so adding a component is just dropping a :tag → fn pair in, with no registration boilerplate to remember or wire up. When the page renders, that [:quote-block …] node becomes your quote-block component, rendered by Reagent like any other — so you write content in Markdown and embed real components (a pull-quote, a chart, an interactive demo) right in the middle of it. The template ships this exact quote-block example, so you've got a working pattern to copy.
There's another nice bonus: those content pages also speak Markdown to AI agents. An assistant or crawler that requests the page with a text/markdown header gets back clean Markdown — your front-matter and prose — instead of a JavaScript app shell it can't read or a verbose HTML response that it needs to parse. More on why that matters in a moment.
:ssr — server-side rendering
A Reagent single-page app is great for users but rough on search engines and slow on first paint — the browser has to download and run your JavaScript before anything shows up. SSR fixes that. Opt a page in with one line:
(defmethod my-app.page/prerender? :my-page [_] true)
Now when you build, that page gets pre-rendered to static HTML, and the server hands that finished HTML to the browser immediately — fast first paint, fully crawlable — before your Reagent app quietly takes over. You write your pages the normal way; flipping on prerendering is a one-liner per page.
Here's the part that pairs neatly with the AI-agent angle: the prerender step also produces a Markdown version of each page, and the routing is already wired so that a request with a text/markdown header gets that Markdown back automatically. You don't configure anything — opt a page into SSR and it's simultaneously fast for browsers, friendly to search engines, and readable by agents. (If you don't need any of this, leave SSR off and you skip the extra Node build step entirely.)
:auth — JWT auth
This is the one that saves the most time. Auth is the part of every new app that's tedious to get right and easy to get wrong, and the template hands you a working version of the whole thing: signin, signup, forgot-password, and recover-password flows, JWT cookie sessions, CSRF protection, a user in your schema, and social login wired up for Google and Apple. It's ready to use the moment you scaffold — there's even seeded test users so you can log in on day one.
Because it's all generated into your repo as ordinary code, customizing it is just editing files. The most common tweak — where users land after they sign in — is a single clearly-marked extension point, but nothing's off limits. Restyle the signin page, add a field to the user, change the redirect rules; it's your code to shape.
TIP: Turn
:authoff and the rest of the app doesn't notice — the database scripts, schema setup, and seed data all keep working. Each feature is a clean cut, so you never inherit a half-removed feature.
:websocket — WebSocket support
When request/response isn't enough and you need the server to push to the client — live updates, notifications, a chat feed — this drops in a ready-to-use WebSocket channel with the server endpoint and client plumbing already connected. Leave it off and none of it ships.
Niceties you get for free
A couple of things show up in every app you scaffold, no checkbox required.
Your site is readable by AI agents. This is a separate problem from SEO. Search-engine crawlers want HTML, which is exactly what SSR gives them. AI agents are different: hand one a full HTML page and it has to burn tokens wading through <div>s, classes, and markup just to find the actual content. So your scaffolded app offers them a shortcut — any page backed by the content pipeline or SSR returns clean Markdown to a request that asks for text/markdown, while normal browsers still get the full rich app. The agent gets just the prose, no markup tax. You write your pages once; browsers, search engines, and agents each get the format that suits them.
Deep links scroll to the right spot. Link to /docs/setup#installation and the page actually scrolls to the installation heading after it loads — on every route, automatically. SPA routing famously breaks anchor links, and normally you'd patch it page by page. Here it's handled once for the whole app, so it just works.
Database backends, no docker required
The template supports four backends, and choosing between them at scaffold time means you don't end up with config for three databases you don't use:
| Backend | When to pick it |
|---|---|
| Datomic Pro | You want immutable history, datalog queries, the works. Free as of 2023 — no my.datomic.com credentials needed. First boot downloads the transactor (~300 MB) to ~/.c3kit/datomic-pro/. |
| SQLite | You want a single-file dev database with zero setup. Fantastic for prototypes and local-first apps. |
| Postgres | You want a real, relational, production-grade SQL DB. The hook generates a createdb-based bin/db for local setup. |
| In-memory | You want the fastest possible feedback loop. bin/db is a no-op; the DB starts and dies with the JVM. |
Whichever you pick, the template generates a bin/db script tailored to that backend, and clj -M:test:migrate / clj -M:test:seed work the same way across all of them — thanks to c3kit's bucket library doing the abstraction work.
Note on Datomic: If you're new to Datomic, the transactor download can feel a little heavy. The
bin/dbscript prompts you on first run before downloading anything, and the README in your scaffolded project documents what's happening and why.
After scaffold: what's in the box
Once c3kit-jig create finishes, cd into your new project, and you'll find a set of aliases ready to go:
bin/db                  # start (or initialize) the database
clj -M:test:migrate     # run migrations
clj -M:test:seed        # seed dev data (auth only)
clj -M:test:spec        # Clojure specs
clj -M:test:cljs        # ClojureScript specs (auto-watch)
clj -M:test:css         # compile CSS (auto-watch)
clj -M:test:cljss       # CSS + CLJS auto-watch combined
clj -M:test:dev         # server + specs + cljs in one process
clj -M:test:run         # server only
The clj -M:test:dev alias is the workhorse — it runs the server, the Clojure spec auto-runner, and the CLJS compile-and-test loop all in one JVM. Save a file, see specs re-run, see the browser hot-reload. That's the loop.
A note for folks on Java 23+
The first time you fire up the server (or bin/db, if you picked Datomic) on a really fresh JDK, you might see a wall of scary-looking warnings:
WARNING: A terminally deprecated method in sun.misc.Unsafe has been called
WARNING: sun.misc.Unsafe::objectFieldOffset has been called by io.netty.util.internal.PlatformDependent0$4 (.../netty-common-4.1.100.Final.jar)
WARNING: sun.misc.Unsafe::objectFieldOffset will be removed in a future release
Don't panic — this isn't your code, and nothing is broken. The culprit is Netty, which gets pulled in transitively by things like the Datomic peer, the Redis client, and the AWS SDK. Netty 4.1.x leans on some sun.misc.Unsafe memory methods that Java has slated for removal, and on JDK 23+ the JVM started warning loudly about it. Netty dropped Unsafe in 4.2.x, but Datomic's peer still drags 4.1.x in transitively and can't move up yet, so the whole dependency graph is held back. On JDK 17 or 21 you won't see any of this — the warnings simply don't exist there.
If the noise bugs you and you're on JDK 23+, you can silence it today with one JVM flag — --sun-misc-unsafe-memory-access=allow. Add it to the :run/:server aliases in deps.edn (and to bin/db if you're on Datomic):
:run      {:jvm-opts ["--enable-native-access=ALL-UNNAMED"
                      "--sun-misc-unsafe-memory-access=allow"]
           :main-opts ["-m" "acme.main"]}
:server   {:jvm-opts ["-Xmx1g" "-server"
                      "--enable-native-access=ALL-UNNAMED"
                      "--sun-misc-unsafe-memory-access=allow"]
           :main-opts ["-m" "acme.main"]}
Note: This flag was introduced in JDK 23 and fails to start on JDK 17/21 — which is exactly why it isn't baked into the scaffold (the template's floor is Java 17+). Only add it if you're running on JDK 23+ and want the warnings gone before the real fix lands.
And the real fix? It's just upstream catching up. In a scaffolded project, the Netty 4.1.x dependency rides in through c3kit-wire, which pulls in the Redisson and Lettuce Redis clients — and those, in turn, sit on Netty 4.1.x. Once c3kit-wire ships a release that bumps them to Redisson 4 / Lettuce 7 (both on Netty 4.2.x), non-Datomic projects can clear the warning just by upgrading c3kit-wire — nothing else pins them to 4.1.x. Datomic projects should hold off, though: the Datomic peer will keep dragging Netty 4.1.x back into the graph until the peer itself bumps to 4.2.x, so upgrading wire early won't actually help. Either way, it's a cosmetic warning, not a bug — your app runs fine in the meantime.
Migrations, built in
Every app you scaffold — no matter which features you picked — comes with database migrations wired up and a home for them already created: a migrations/ directory under src/clj/ (your project's namespace) and a matching migration_specs/ under spec/clj/, each with a README showing the pattern.
A migration is a dated namespace with an up (and optionally a down):
(ns my-app.migrations.20260601_add_user_token_version
  (:require [c3kit.bucket.migrator :as m]))

(defn up []
  (m/add-attribute! :user :token-version {:type :long}))

(defn down []
  (m/remove-attribute! :user :token-version))
The nice part is that migrations run as a service — they're not just a script you have to remember to invoke. You can apply pending migrations on demand with clj -M:test:migrate, but they also run automatically when the server boots, so a freshly pulled branch or a fresh deploy brings the database up to date on its own. No "oops, forgot to migrate" surprises.
The spec directory is there for the same reason your app code is tested: write a spec for a migration, tag it :migration, and it stays out of your normal test run (-t=~migration) until you ask for it (-t=migration). It's a small thing, but it means migrations are first-class, tested code from day one rather than an afterthought.
Seeding dev data
An empty database is no fun to develop against, so the template gives you a seed script you can fill with whatever your app needs. If you scaffolded with auth, it already seeds a couple of users (Road Runner and Wiley Coyote) so you can log in immediately. Adding your own data is a matter of editing the seed script under dev/ (it lives under your project's namespace — dev/my_app/seed.clj for an app named my-app).
You declare an entity with entity, passing the kind, a map of fields used to find an existing row, and a map of the rest of its attributes. Then you deref it inside -main to insert it:
(def acme-corp
  (entity :company
          {:name "Acme Corp"}        ; how to find it
          {:industry "explosives"})) ; everything else

(defn -main []
  (init!)
  @acme-corp
  (System/exit 0))
Run clj -M:test:seed and you'll see it print CREATING: the first time, then EXISTS: on every run after — the seed is idempotent, so re-running it won't pile up duplicates, and if you change an attribute it prints UPDATING: and fixes the row. You can run it as often as you like without making a mess.
Test fixtures that stay in sync
Tests need data too, and the template keeps that data in one shared place: test_data.cljc, under spec/cljc/ in your project's namespace (spec/cljc/my_app/test_data.cljc for an app named my-app). Because it's CLJC, the same fixtures are available to both your Clojure and ClojureScript specs — define a test entity once, use it everywhere.
You register a kind by adding a defmethod that builds its entity, and declare any kinds it depends on in the deps map (so a test asking for a :company automatically gets its prerequisites set up first):
(def acme-corp (entity :company))

(defmethod -init-kind! :company [_]
  (init-entity! acme-corp (db/tx :kind :company :name "Acme Corp")))

(def deps {:company []
           :all     [:company]})
Then any spec pulls in exactly the data it needs with one helper in its describe:
(with-memory-kinds :company)
That spins up an in-memory database, installs your schema, seeds the :company fixtures before each test, and clears them after. Deref acme-corp in a test and you get a fresh copy reloaded from the database. It's the same idea as the seed script — declare your data once, reuse it everywhere — just pointed at your test suite.
Your scaffolded README.md goes deeper on all of this, including production email setup, deployment notes, and how to add new :kinds to the schema.
What's next
This is just the start. The roadmap includes:
fe-reagent— Reagent SPA with optional static-site generation.fe-ssg— an Astro-inspired ClojureScript static-site generator template.full-stack-non-reagent— for folks who want a CLJS frontend that isn't Reagent.
If there's a template you'd love to see, open an issue or send a PR.
Try it
If you've been putting off that Clojure side-project because the initial setup felt like a slog, give c3kit-jig a spin:
curl -fsSL https://raw.githubusercontent.com/cleancoders/c3kit-jig/main/cli/install.sh | bash
c3kit-jig create my-app
A minute later, you'll have a tested, running, full-stack Clojure app with exactly the features you picked — and you can spend your time actually building the thing instead of wiring it up.
Happy hacking!