
This past Monday was Memorial Day, which for many of us meant a three-day weekend. Ahhh the three-day weekend, that wonderful time when I can finally get around to some of the things I've been putting off, like:
- actually cleaning my office
- getting to that one task that keeps slipping to the bottom of the honey-do list, or
- finally starting to build that new app I've been thinking of for months.
The idea of starting to build out a new application is always exciting; as developers, we get our kicks on turning ideas into functioning software. All too often, though, our excitement is extinguished as we're quickly reminded of how much upfront boilerplate we need to write before we actually get to the fun part of developing features.
The JavaScript world has npm create vite@latest or npx create-next-app. Rails has rails new. You answer a few prompts, hit enter, and you've got a working app — routing, asset pipeline, database, the whole stack.
When it comes to building a Clojure app, however, there isn't something like Vite that makes building from a template so easy -- so we built it! Introducing our newest addition to the Clean Coders Clojure Kit (c3kit): c3kit-jig, an interactive CLI written in Babashka with a library of templates to get your next project started faster.
If you've never set foot in a woodshop, the name might need a little unpacking. A jig is a fixture a woodworker builds once to guide the tool through the same cut over and over — every part comes out identical, and you never have to measure twice. You spend a bit of effort up front building the jig so that every part after it is fast, repeatable, and correct. That's exactly the trade c3kit-jig makes for your project setup: the boilerplate gets built once, the right way, so every app you scaffold starts from the same solid, tested foundation.
What you get
Out of the box, c3kit-jig ships one template — full-stack-reagent — which produces:
- Clojure backend using Compojure for routing and the c3kit family for the boring-but-essential stuff (config, persistence, HTTP plumbing).
- Reagent frontend with CLJS routing via Secretary + Accountant and hot-reloading CLJS and Garden-style CSS compilation brought to you by C3Kit Scaffold.
- Speclj test suites wired for Clojure, CLJS, and CLJC out of the box - all the template code is tested and available for you to change or extend as needed.
- A choice of four database backends — Datomic Pro, SQLite, Postgres, or in-memory — selected at scaffold time. You can easily change to any other database supported by C3Kit Bucket by editing the bucket configuration in
config.clj. - Optional features you can opt in or out of: a Markdown content pipeline, server-side rendering, client-side Markdown, JWT auth, and WebSockets.
- A
git init+ initial commit so you start with a clean history.
Installing the CLI
One curl-pipe-bash and you're done:
curl -fsSL https://raw.githubusercontent.com/cleancoders/c3kit-jig/main/cli/install.sh | bash
The installer checks for Babashka, Java, and gum (the Charm CLI toolkit that powers the checkbox UI). If Babashka or gum are missing, it tells you it will install those dependencies along with the CLI and asks permission to proceed. If Java is missing, it warns you that you'll need it for Clojure development to work. The CLI itself is a single bb uberscript distributed via GitHub Releases.
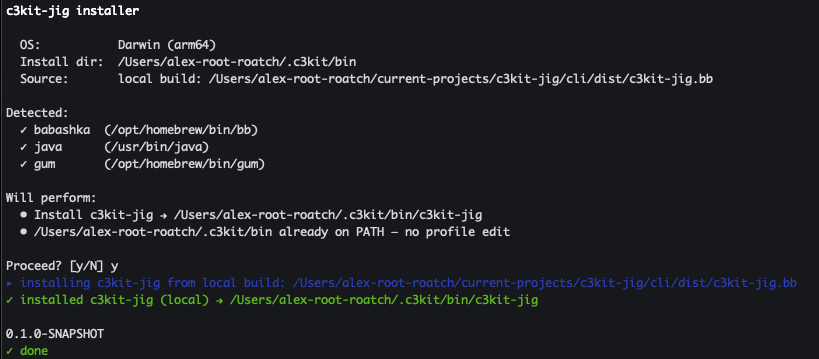
Note: Babashka is required because
c3kit-jigis abbscript. Java is only needed for the projects you scaffold, not for the CLI itself.
If you don't trust pipes-into-bash (fair), you can grab install.sh, eyeball it, and run it locally. It's about 200 readable lines of bash.
Command surface
Running c3kit-jig with no args prints the help screen:
c3kit-jig — scaffold and manage c3kit Clojure projects

USAGE
  c3kit-jig <subcommand> [options]

SUBCOMMANDS
  create [<name>] [options]   Scaffold a new project from a template
  list                        List available templates
  upgrade                     Download latest CLI release
  version                     Print CLI version
  help                        Show this help
The one you'll use 99% of the time is create. Everything else is housekeeping.
Useful flags
Run c3kit-jig create --help and you'll get the full list:
| Flag | What it does |
|---|---|
-t, --template ID |
Template id (skip the template prompt). |
--template-ref REF |
Git ref / tag / branch to fetch the template from. |
--template-dir PATH |
Use a local templates dir instead of fetching (great for template development). |
-y, --yes |
Accept all feature defaults. Non-interactive. |
--install |
Run clj -P and npm install after scaffold. |
--no-git |
Skip git init and the initial commit. |
--db ID |
Database id (skip the database prompt). |
--feature K=V |
Override a feature default (repeatable, e.g. --feature auth=false). |
--debug |
Print full stack traces on error. |
-h, --help |
Show this help. |
Running it in CI
Every prompt the wizard asks has a flag equivalent, which means you can drive the whole thing non-interactively — exactly what you want in a CI pipeline or a setup script. Pass --yes to accept defaults, then override anything you care about with --template, --db, and one --feature K=V per toggle. --yes requires --template, since there's no sensible default for which template to scaffold:
c3kit-jig create my-app \
  --template full-stack-reagent \
  --db sqlite \
  --feature auth=false \
  --feature ssr=false \
  --yes --no-git
That runs start to finish with zero prompts. Or, if you'd rather be walked through it — and I'd recommend that the first time — just run c3kit-jig create and let the wizard drive.
The interactive wizard
c3kit-jig create walks you through every decision the template exposes, one prompt at a time.
1. Project name
Project name [my-app]: my-cool-app
It validates the name (kebab-case, no reserved words) and uses it to derive every variant the template needs — my-cool-app for namespaces, my_cool_app for directory paths, MyCoolApp for display strings, and MY_COOL_APP_ for env-var prefixes. You name it once and the CLI handles the rest.
2. Template selection
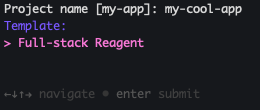
If you only have one template available (currently the case), this step is a one-line confirm. When more templates ship — and several are in the roadmap — you'll see a picker:
3. Feature checkboxes
If gum is installed (and it will be, since the installer drops it in), you get a real checkbox UI. Spacebar toggles, enter confirms. Defaults are pre-checked based on the template manifest.
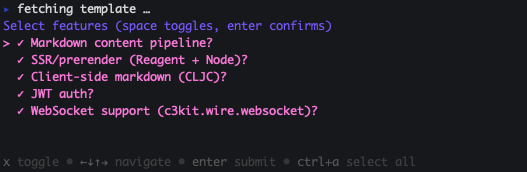
If gum isn't around (say, you're SSH'd into a stripped-down box), it falls back to a simple y/n prompt for each feature, one at a time. Either way, you end up with the same answer set.
4. Database
Database:
  1) Datomic Pro (free, single-jar transactor) (default)
  2) SQLite (JDBC)
  3) Postgres (JDBC)
  4) In-memory (dev only)
Choice [default]:
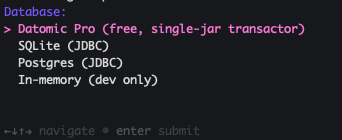
The arrow-key version (also gum-powered when available) is even nicer:
5. Scaffold
Once you've answered everything, the CLI bootstraps your project, commits the result to git, and renders a "next steps" list that shows you all the pre-built commands that come with the template:
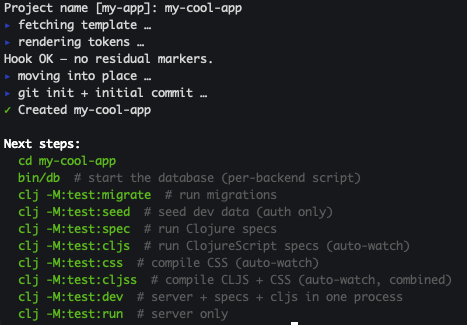
The whole thing takes a couple of seconds. And the result is an honest-to-goodness running Clojure project — clj -M:test:spec passes, clj -M:test:cljs once passes, and you can cd in and start working.
A closer look at the full-stack-reagent template
Picking features at the wizard is one thing. Knowing what they actually do is another. Here's the rundown.
:content — Markdown content pipeline
Drop a Markdown file under content/<type>/<permalink>/ and a route registers itself automatically. Great for blogs, docs sites, marketing pages — anywhere you want to write prose without building a CMS. It uses CommonMark with GFM extensions (strikethrough, tables) under the hood.
:ssr — server-side rendering
Reagent SSR via a Node prerender step. Opt a page in with (defmethod my-app.page/prerender? :my-page [_] true), and the build will generate static HTML caches that the server can serve directly. Great for SEO and first-paint performance. If you don't need it, leave it off — it pulls in Node and adds complexity to the build and deploy.
:markdownc — client-side Markdown
Parses Markdown to Hiccup right in the browser, no server round-trip. Reach for this when the Markdown lives on the client — user-authored comments, a live preview pane next to an editor, or content you've already pulled down via an API and want to render reactively. Where :content is about server-rendered prose baked in at build time, :markdownc is about rendering Markdown on the fly in your CLJS components.
:auth — JWT auth
The big one. Toggles on a full signin / signup / forgot-password / recover-password flow, JWT cookie middleware, anti-forgery protection, a user kind in the schema, and a social-login kind for things like Google / Apple OAuth.
TIP: Even if you turn
:authoff, the template'sbin/dbscript, schema setup, and dev seed data all keep working. Each feature has clean cut-points; nothing leaves a dangling reference.
Database backends, no docker required
The template supports four backends, and choosing between them at scaffold time means you don't end up with config for three databases you don't use:
| Backend | When to pick it |
|---|---|
| Datomic Pro | You want immutable history, datalog queries, the works. Free as of 2023 — no my.datomic.com credentials needed. First boot downloads the transactor (~300 MB) to ~/.c3kit/datomic-pro/. |
| SQLite | You want a single-file dev database with zero setup. Fantastic for prototypes and local-first apps. |
| Postgres | You want a real, relational, production-grade SQL DB. The hook generates a createdb-based bin/db for local setup. |
| In-memory | You want the fastest possible feedback loop. bin/db is a no-op; the DB starts and dies with the JVM. |
Whichever you pick, the template generates a bin/db script tailored to that backend, and clj -M:test:migrate / clj -M:test:seed work the same way across all of them — thanks to c3kit's bucket library doing the abstraction work.
Note on Datomic: If you're new to Datomic, the transactor download can feel a little heavy. The
bin/dbscript prompts you on first run before downloading anything, and the README in your scaffolded project documents what's happening and why.
After scaffold: what's in the box
Once c3kit-jig create finishes, cd into your new project, and you'll find a set of aliases ready to go:
bin/db                  # start (or initialize) the database
clj -M:test:migrate     # run migrations
clj -M:test:seed        # seed dev data (auth only)
clj -M:test:spec        # Clojure specs
clj -M:test:cljs        # ClojureScript specs (auto-watch)
clj -M:test:css         # compile CSS (auto-watch)
clj -M:test:cljss       # CSS + CLJS auto-watch combined
clj -M:test:dev         # server + specs + cljs in one process
clj -M:test:run         # server only
The clj -M:test:dev alias is the workhorse — it runs the server, the Clojure spec auto-runner, and the CLJS compile-and-test loop all in one JVM. Save a file, see specs re-run, see the browser hot-reload. That's the loop.
Your scaffolded README.md walks through everything in detail, including production email setup, deployment notes, and how to add new :kinds to the schema.
What's next
This is just the start. The roadmap includes:
fe-reagent— Reagent SPA with optional static-site generation.fe-ssg— an Astro-inspired ClojureScript static-site generator template.full-stack-non-reagent— for folks who want a CLJS frontend that isn't Reagent.
If there's a template you'd love to see, open an issue or send a PR.
Try it
If you've been putting off that Clojure side-project because the initial setup felt like a slog, give c3kit-jig a spin:
curl -fsSL https://raw.githubusercontent.com/cleancoders/c3kit-jig/main/cli/install.sh | bash
c3kit-jig create my-app
A minute later, you'll have a tested, running, full-stack Clojure app with exactly the features you picked — and you can spend your time actually building the thing instead of wiring it up.
Happy hacking!